Leaderboard
-
.gif.64d5ec5abd3a485de3668876853da533.gif)
Xironite
Members2Points1Posts -
Draco18s
Members1Points16559Posts -
ZephyrWolf_
Members1Points17Posts
.thumb.gif.3a06d7719745b7f7ae38c6853b8a578e.gif)

Popular Content
Showing content with the highest reputation on 10/06/21 in all areas
-
2 pointsXironite Minecraft Server [1.8.x – 1.18.x] Xironite is a server dedicated to interacting with our community through hosting events and listening to player feedback! Our main feature is Towny! Towny gives our players a chance to work together and try to make the largest town while recruiting more players to help them. If competition is more your speed, you can compete against other towns in a variety of contests! You can do anything you want, from creating the largest town with your friends to dominating the economy and skill leaderboards! Xironite also adds a tonne of features to Survival, making it feel fresh once again. From custom enchants and tools to dungeons and bosses that will test your skills, Xironite has plenty to keep you busy! On top of all that, our player ranks can be earned in-game through playtime and resource gathering. No need to pay for cool perks! Xironite is constantly evolving based on player feedback and ideas from our amazing management. Join now before you miss our next event! How to Join? Join now using our IP: mc.xironite.org Features Bosses Dungeons Crates & Lootbags Events Robust Anti-Cheat Friendly & Active Community Custom Enchants Custom Tools & Armour PyroMining & PyroFishing Player Feedback & Suggestions Custom Textures ...and much more! Social Media Discord Instagram TikTok YouTube2 points
-
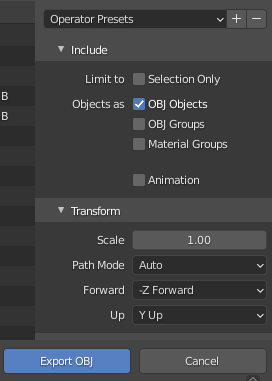
The forge read the docs wiki is a little out of date. It is a lot easier now. I learnt how to do this from reverse engineering minecraft's and forge's code. I use blender to create my model. A fantastic tutorial on how to create pixel art based models in blender can be found here: To export: go to File>Export->Wavefront (.obj) Your settings should reflect this. This will convert the Blender coordinate system into Minecraft's. When you export your model you will get two files, an obj and a mtl. e.g. block_name.obj and block_name.mtl. The obj file describes the shape of the model while mtl file describes how it looks. Keep both files next to each other. Go into your mod resource directory and place these two files where you want them, e.g. assets/modid/models/block/path Within block_name.obj, make sure the mtllib points to the mtl file. Remember, your obj and mtl file should be next to each other. It should read: mtllib block_name.mtl Still within block_name.obj, make sure the correct material library is being loaded (Ill show you where this is declared in a sec.) (Just scroll down until you find the line, don't write your own) usemtl block_name_mat Your block_name.mtl file should look like something like this when you export it. If it doesn't have all of these lines, don't worry, Minecraft doesn't care too much about these numbers. # Blender MTL File: 'bloomery.blend' # Material Count: 1 newmtl block_name_mat Ns 323.999994 Ka 1.000000 1.000000 1.000000 Kd 0.800000 0.800000 0.800000 Ks 0.500000 0.500000 0.500000 Ke 0.000000 0.000000 0.000000 Ni 1.000000 d 1.000000 illum 2 Pretty much everything here can stay as is. "newmtl" is where we declare the material the obj loads with "usemtl". Make sure these match. Next we need to let Minecraft know where to find out texture. Still within block_name.mtl add a map_Kd line below newmtl. If you forget this line, Forge will still load your model, but it will be all white. newmtl block_name_mat map_Kd modid:block/path/block_name Ns 323.999994 Ka 1.000000 1.000000 1.000000 Kd 0.800000 0.800000 0.800000 Ks 0.500000 0.500000 0.500000 Ke 0.000000 0.000000 0.000000 Ni 1.000000 d 1.000000 illum 2 Place your texture within assets/modid/textures/block/path. The map_Kd should point to this location. Next, create a blockstate file for your block as normal. [block_name.json]. This will load a json model file. This has to be next to your obj and mtl files. { "variants": { "": { "model": "modid:block/path/block_name" } } } Block Model [block_name.json] { "loader": "forge:obj", "model": "modid:models/block/path/block_name.obj", "flip-v": true } Enabling flip-v will depend your model file. This just flips the way the texture is applied. If your texture looks upside down, change this to false. Your assets folder structure should look like this now: assets/modid/ blockstates/ block_name.json models/block/path/ block_name.json block_name.obj block_name.mtl textures/block/path/ block_name.png

 1 point
 -
You're not going to make this work. Sorry! Here's the code that handles whether or not the player can wear a pumpkin: public static EntityEquipmentSlot getSlotForItemStack(ItemStack stack) { if (stack.getItem() != Item.getItemFromBlock(Blocks.PUMPKIN) && stack.getItem() != Items.SKULL) { if (stack.getItem() instanceof ItemArmor) { return ((ItemArmor)stack.getItem()).armorType; } else if (stack.getItem() == Items.ELYTRA) { return EntityEquipmentSlot.CHEST; } else { return stack.getItem().isShield(stack, null) ? EntityEquipmentSlot.OFFHAND : EntityEquipmentSlot.MAINHAND; } } else { return EntityEquipmentSlot.HEAD; } } Which is in EntityLiving.class You'll have to instead create an item that is a subclass ItemArmor, that when right clicked, creates your block in the world (think about how Cake works, or Seeds). Your hat-block would then not have an accompanying ItemBlock, and would instead drop the hat armor when broken.1 point