Okay, I normally do not provide people with ready-to-use code because it is my firm belief that people need to learn how to code themselves, not use ready solutions. However this might be a special case because it requires a descent OpenGL knowledge that you might not be willing to learn because you don't really need it in minecraft modding or even usual java programming. It is also quite difficult to understand out of the box if you've never worked with it before. So I will deviate from my usual ideas and provide you with some code that will be commented so you have an understanding of what's going on and can actually learn something from it.
// Define the width and the height of the framebuffer, the texture and as a result the final png file.
int width = 256;
int height = 256;
// Get the framebuffer object that was already in use since we have to restore the state when we are done
Framebuffer fbo = Minecraft.getMinecraft().getFramebuffer();
// Create a new framebuffer object with the width and the height defined. The last parameter defines whether to use depth or not.
Framebuffer framebuffer = new Framebuffer(width, height, true);
// Bind the created framebuffer as the active framebuffer. The last parameter also adjusts the viewport to the dimensions of our framebuffer.
framebuffer.bindFramebuffer(true);
// These are not really needed, however I prefer do draw over black. By default the texture would be white.
GlStateManager.clearColor(0, 0, 0, 1);
// No need to clear depth/stencil since those are clean as is since nothing has been drawn yet.
GlStateManager.clear(GL11.GL_COLOR_BUFFER_BIT);
// Draw the actual entity. You might want to play with positions and scaling.
GuiInventory.drawEntityOnScreen(200, 200, 100, 0, 0, new EntitySheep(Minecraft.getMinecraft().world));
// Alternatively if the GL matrix isn't as desired:
/*
GlStateManager.pushMatrix();
// Do matrix manipulations - scaling, translating, rotating.
GuiInventory.drawEntityOnScreen(200, 200, 100, 0, 0, new EntitySheep(Minecraft.getMinecraft().world));
GlStateManager.popMatrix();
*/
// Allocate a buffer for GL to dump pixels into.
IntBuffer pixels = BufferUtils.createIntBuffer(width * height);
// Bind the framebuffer's texture.
GlStateManager.bindTexture(framebuffer.framebufferTexture);
// Dump the pixels onto the IntBuffer. Note that the pixel format is BGRA and the pixel type is 8 bits per color.
GlStateManager.glGetTexImage(GL11.GL_TEXTURE_2D, 0, GL12.GL_BGRA, GL12.GL_UNSIGNED_INT_8_8_8_8_REV, pixels);
// Allocate the array to hold pixel values.
int[] vals = new int[width * height];
// Copy the buffer to the array.
pixels.get(vals);
// Rearrange pixel values to correct positions so they can be read by the BufferedImage correctly.
TextureUtil.processPixelValues(vals, width, height);
// Create the BufferedImage object.
BufferedImage bufferedimage = new BufferedImage(width, height, BufferedImage.TYPE_INT_RGB);
// Copy the pixels from the array onto the BufferedImage.
bufferedimage.setRGB(0, 0, width, height, vals, 0, width);
// Create a file to store the image within. Here the file will be outputted to the game's base directory with a name of img.png.
File f = new File(Minecraft.getMinecraft().mcDataDir, "img.png");
f.createNewFile();
// Finally write the buffered image into the file.
ImageIO.write(bufferedimage, "png", f);
// Delete the framebuffer from memory. It is no longer needed.
framebuffer.deleteFramebuffer();
// If the game had a buffer bound. In most cases it did but who knows what could be the case with mods and such.
if (fbo != null)
{
// Restore the original framebuffer. The parameter set to true also restores the viewport.
fbo.bindFramebuffer(true);
}
else
{
// If the game didn't have a framebuffer bound we need to restore the default one. It's ID is always 0.
GL30.glBindFramebuffer(GL30.GL_FRAMEBUFFER, 0);
// We also need to restore the viewport back in this case.
GL11.glViewport(0, 0, Minecraft.getMinecraft().displayWidth, Minecraft.getMinecraft().displayHeight);
}
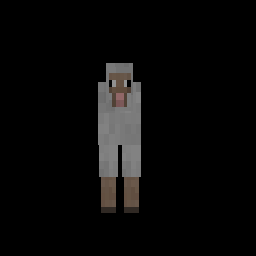
And here is the resulting image:
Note that you must do all this in a thread that is the main render thread!
