Leaderboard


Popular Content
Showing content with the highest reputation on 02/14/21 in all areas
-
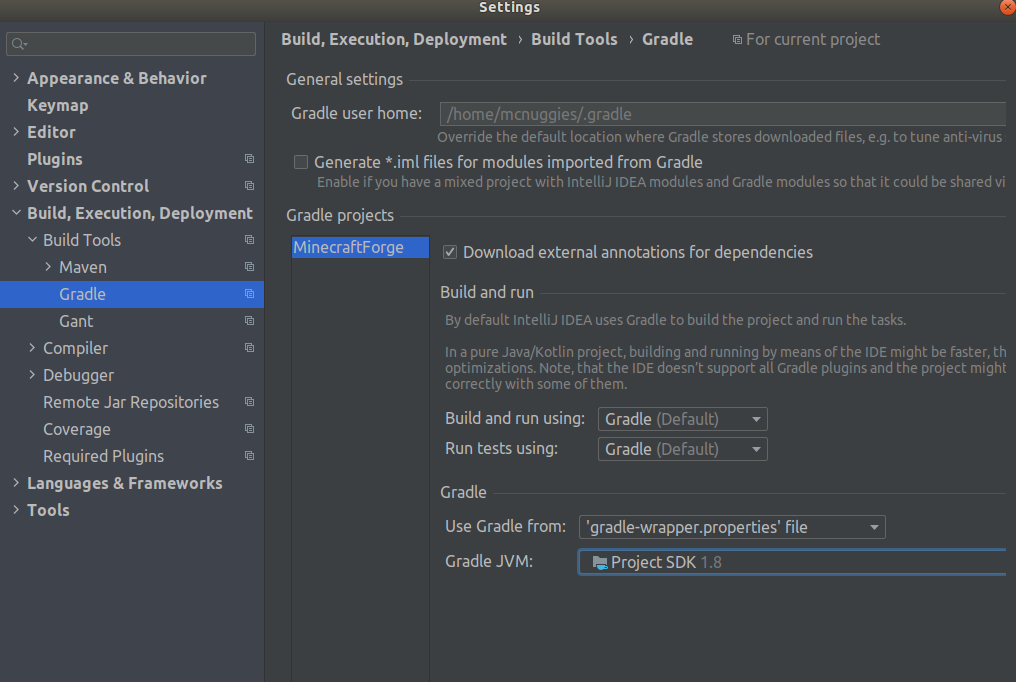
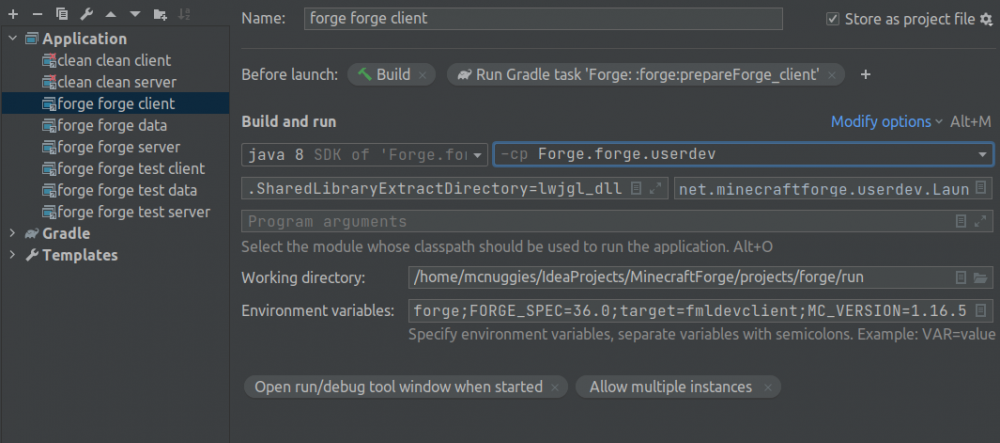
Solved! But there is more to the solution - see the last comment to this post. Basically, if you make the changes in this comment, but still run the Gradle forge_client ("Run Configuration") instead of the "Application", you will still hit this error (the classpath can't be set for Run Configurations in IntelliJ 2020.3). The issue was two-fold: My Run Configuration was incorrect My project's Gradle settings were incorrect Post-mortem: The Run Configuration could not be corrected without first correcting the Gradle settings The option you need to select simply won't show if the project's Gradle settings are incorrect (kind of a "duh" moment, but as I mentioned, I am relatively inexperienced with IntelliJ 🙃 You have to fix Gradle before you can fix your run configuration I'm not entirely sure of how "obvious" this may seem to most, but I had no clue: Use gradle from 'gradle-wrapper.properties' file Set the Gradle JVM to the "Project SDK" (NOT OpenJDK - not sure why, yet) Once you fix the Gradle settings, rebuild the Gradle project then run edit the Run Configuration for the forge_client task After fixing your Gradle, you should be able to click the dropdown and change it from -cp Forge.forge to -cp Forge.forge.userdev (you should see the option available to you - if not, something else is going on and I don't know how to help you... sorry 💔) Save the change to your Run Configuration > run the genIntellijRuns task > run the forge_client task > you should be good to go now! Screenshots:

 1 point
 -
Awesome, thanks @MistaOmega - I will give this a shot and see if it helps. Will report back with my findings 🤘 Update! That plugin worked for me! I was unable to figure out how to fix my old environment, but creating a new one with that plugin got me up and running without issue! I'm not sure what this plugin does differently from the setup docs, but for anyone else hitting this, try the plugin first I intend to come back later and document what needs to be done when you do this manually Just a heads up for others! The project that this plugin sets up is quite a bit different from the cloned Forge repo. This isn't necessarily a problem, but means that you'll likely have trouble if you try to follow Forge's "Getting Started" docs while using this plugin. If you use the plugin, that should be considered your entire "getting started" process. Once you complete setup, simply start modding and testing your mod with the runClient gradle task.1 point
-
Usually when I get error like this I attempt the build gradle again, and then the "genIntelliJruns". if not I usually go and make a new project and move my files over after the fact. Might I also recommend this plugin: https://plugins.jetbrains.com/plugin/8327-minecraft-development It helps to get you started if you're having a rough time getting set up xo1 point
-
1 pointThere are two possibilities way 1 (difficult): create your own IItemTier and overwrite all tools with your new properties and register them with the vanilla name and the vanilla id way 2 (easy): use events to change the properties: - PlayerEvent#HarvestCheck -> harvestLevel - PlayerEvent#BreakSpeed -> breakSpeed - LivingDamageEvent -> damage of tools - LivingEntityUseItemEvent -> durablity1 point
-
you have examples in the vanilla source code, check the Shapeless or Shaped crafting recipe classes for instance. (not the builder classes, the builders are for the data generation, and since you are writing the jsons by hand, you won't need them) - you will need to register the serializer and use the registered instance in IRecipe#getSerializer. you can do this using deffered registers - you'll also need to register a recipe type, and use the registered instance in IRecipe#getType. there isn't a deffered register for recipe types, so you'll need to subscribe to the RecipeSerializer registry event and use IRecipeType#register, to register the recipe type - for IRecipe#getId you need to return the ResourceLocation that's passed to the class in the constructor. after that you can change the type in the json to match your recipe type name (e.g.: "mymod:myrecipetype") for the serializer class you'll need to handle writing and reading to packet buffers, and deserializing the json recipe's into an instance of the recipe. the vanilla classes have all examples you need to figure how these methods can be implemented.1 point
-
https://minecraft.gamepedia.com/Breaking#Speed https://minecraft.gamepedia.com/Enchanting_mechanics#Enchantability1 point
-
1 pointSome zip managers like to take control of the .jar file extension away from Java. Make sure you have Java installed and try running Jarfix once, then try the installer again.1 point
-
first my code example is from 1.16 but I think it works also in 1.15.2. your code looks okay, unfortunately I can't tell you where the error is. but i have an idea where the mistake is, can you show your mod class constructor.1 point